Sunday, July 27, 2014

Attention Teachers!


One of my dearest friends is one of the BEST Kindergarten/1st grade teachers. I'm not exaggerating. She is more passionate about her job than anyone I know. She pours so much time and love in to her kids. Unlike many of us, she has  the patience, creativity, and enthusiasm that makes her perfect to be an elementary school teacher. She recently started a blog of her own to share the adventures in her classroom and to connect with other teachers. I don't know much about teaching but I know that any teacher could benefit from reading her blog.

Check out Mrs. Saxon's blog-Loopin' Littles. It's seriously adorbs.


You Can also follow her on Social Media!

http://instagram.com/loopinlittleshttps://www.bloglovin.com/blog/12588323


I can't wait to follow her classroom throughout the year and to see her blog grow!


Monday, July 14, 2014

Making 2 Shower Curtain Panels out of 1

Buying our first house made us suddenly realize how expensive everything is. Seriously EVERYTHING. Like light bulbs for example. We recently spent 45 big ones on 12 light bulbs. This is no joke. Don't get me wrong, we are fortunate to have recessed lighting throughout our house but holy smokes that's a lot for some light bulbs. And we even bought the cheapest ones! Don't get all judgy on me because we didn't buy the LED ones. Those were $25 each and we just could NOT justify dropping $200 on some light bulbs. The Lowe's guy was even there trying to talk us into the LED bulbs... 'But these will last you 20 years!'... Umm I will be SHOCKED if we stay in this house for even 10 years. And if we're gonna bite the bullet and replace our bulbs with LED ones, we're gonna do it one at a time. Not when we have to buy 12 at once. Sorry land fill, we'll make up for it in other ways.

Where was I? Oh yeah..everything is expensive. So in order to afford the must-have items like light bulbs, I'm having to get creative to stretch my small DIY project budget as far as possible. One way I stretched it last month was by making two shower curtain panels out of one. I love the look of 2 shower curtain panels layered with one regular sized curtain behind.  I think it makes the bathroom look more finished and expensive and also adds some extra warmth to the room. After doing some research, I decided that I wanted the two outer panels to be regular fabric curtain panels. Shower curtains are often more plastic-y, and I like how thick and substantial normal window curtains are. I was browsing through Target and fell in love with these.
The only problem? They're $25 per panel. I didn't really want to spend $50 on some curtains on top of the regular shower curtain that would go behind it. Lucky for me, I had my thinking cap on. In Devin's words, I was 'using my thinker, not my stinker.' Since each panel was 84" wide, I figured if I cut one in half, I'd still have a nice sized panel to fit my needs. So that's what I did.

I laid out the curtain to see what I was working with.  Amazingly, the Target curtain packing people (technical title) folded the curtain exactly in half before packaging it, leaving me with a perfect fold- aka cutting reference line- right in the center. It's like the curtain was just asking to be cut in half.

I clearly wasn't giving Bear enough attention while cutting the fabric. He let me know.
Next, I just used my handy dandy Heat n Bond Hem tape and ironed on a hem right along the side that I cut.
You can find more details on using hem tape here.

That's really all there was to it. I hung these panels on a separate curtain rod in front of our white shower curtain.


Two curtain panels for the price of one...Not bad!
Have a great evening!
PS I'm Linking up to Liz Marie Blog
and Best of the Nest

Wednesday, July 9, 2014

How to Paint Bathroom Cabinets

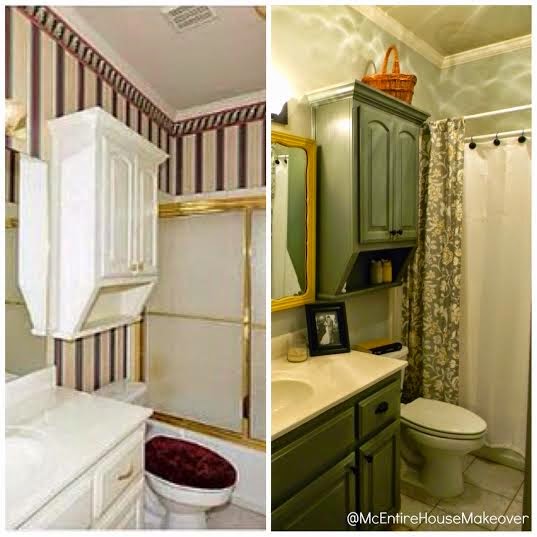
Did y'all check out our guest bathroom reveal? It's bomb.com. I didn't really go into much detail as to how we went through each step though, so I thought I'd break it down for you. So far, we removed the wallpaper and the ugly brass sliding shower door. Next on the to-do list was painting the cabinets. Ohhhh how easily we forget the pain and agony of painting cabinets. I swore I'd never put a paint brush to a cabinet ever again, and here I am doing it 5 months later. The ironic thing is we spent all that money, blood, sweat, and probably tears painting the kitchen cabinets white. These cabinets were already white. Surely I would be happy with these cabinets as is, right? WRONG. That would be way too easy. I stole borrowed the charcoal  bathroom cabinet idea from some beautiful pictures on Pinterest. Here are a few that inspired me.

I love how they all pop against light colored walls. The marble counter tops would sure be nice too, right? Another day, another dollar (or thousand).

We used almost identical steps as  we did with the kitchen cabinets. We first removed the drawers and doors from the cabinets. This time was MUCH easier though. We decided not to paint the inside of the cabinets so we didn't have to completely remove the hardware from the doors....which makes me think: Why did we paint the insides of the kitchen cabinets again? What the heck were we thinking? There must have been a good reason.....

While the cabinet doors were off, we tossed around the idea of keeping the upper cabinets open with some cute baskets. I found some existing baskets (that are obviously too big for the cabinet) to get the idea of what it would look like. While we DO love the look, we DON'T love how all of our business is out for all to see. I could just foresee my OCD husband constantly getting annoyed that the towels weren't completely in line. So that idea was out.


We had to do a little prep work before the sanding and painting party began.When we removed the wallpaper, the caulk in between the wall and cabinets came off and left us with these unfinished, ugly seams.
It's an easy fix though. I just used our DAP Caulk to spread a thin line at the corner and then smooth it out with my finger.
Much better!

Our next step was sanding. We used a 220-grit sandpaper. We didn't necessarily need to completely remove the existing finish. We just wanted to rough them up enough so that the primer would adhere.


 The cabinet doors looked like this when we were done.


The sanding exposed a few holes in the cabinets that we needed to fill, like this one.

That was an easy fix too. We just had to throw some wood filler on there, let it dry, and then re-sand it down. We use Elmer's. Why? It did us well in the first grade so why not use it in our adult life? Although this time we avoided eating it.

Once all the sanding was done, we used tack cloth to remove all the dust.

We also taped off the backs of the doors and the insides of the cabinet.

And then we primed. We used Sherwin Williams Multi-purpose Latex primer. This is my attempt to take a picture of the primed cabinets. 
Iphone + horrible bathroom lighting + white primer on white cabinets = Terrible pictures. 
 
 Picture source: http://www.atlnightspots.com/charles-barkley-daughter-looks-just-like-him/
 At least I tried?

We followed the directions on the primer can and waited an hour before painting. The paint color we chose was Valspar Porcelain Shale but we had Sherwin Williams color match it so we could use their brand of cabinet paint.

 Bear is never far behind. I pinky swear I don't pose him in these pictures.

It took about 3 coats to get the job done.

That's really all there was to it! I feel much less scarred from cabinet painting this time around than I did with the kitchen. We finished the entire project in one weekend. No lie.
We are so pleased with how the color turned out. They really do stand out against the light colored walls.

I recently came across this picture on pinterest....I wonder what Devin will think when I pitch this idea for the master bath? #Icandream

2467832545539884682788 unexpected color in a bathroom 
Picture Source: http://romanceho.me/2014/03/04/unexpected-color-in-a-bathroom/

Have a great rest of your week!
P.S. I'm linking up to DIY Showoff and Not Just a Housewife !


Sunday, July 6, 2014

Bathroom Reveal: How to Transform a Bathroom For Under $200

I have a few smaller completed projects that I need to share but revealing our updated guest bathroom is entirely more exciting. We're finally finished and we are IN.LOVE.
This bathroom even has it's own theme song now.
https://www.youtube.com/watch?v=O-zpOMYRi0w


Yes, I know every word of that song. And yes If you ask, I'll rap it for you. Devin thinks its embarrassing. I think it puts me in the cool club.

We couldn't be more ecstatic with how the bathroom turned out, and stoked (do people still use that word?) with how few Benjamins we had to say goodbye to.

Of course, I first have to start out with some before pictures....you know...to build up the suspense.


Drumroll please.....................................................................................................................................


Aren't these painted mason jars adorbs? More on those in another post.


Bear is enjoying it too.
I'd say this room was a huge success in the McEntire House Makeover Book. This room feels most finished of any other room in the house. I attest the success to having a plan. That sounds kind of obvious but you'd be surprised at how many rooms we've already worked on with no real plan in mind to start. 

Our plan for this room revolved around the shower curtain. That allowed us to choose the wall and cabinet colors as well as the accessories to coordinate with the fabric. I've learned (the hard way) that rooms don't look as put together if you start with a wall color. It's much much easier coordinating a wall color to a fabric or statement piece than the other way around. 

Here's the short list of the projects we completed in here:
  •  Removed the sliding shower door (You can find out how we did it here)
  • Stripped the top layer of the wallpaper
  • Textured the walls
  • Painted the cabinets
  • Removed the old mirror and replaced it with a new painted one
  • Made 2 shower curtain panels out of 1
  •  Spray painted the fixtures (ORB)
I'll go into more detail about each of the steps in future posts.


The best part of this makeover is that we did it with less than $200! Holla! Here's how everything shakes out:
  • Mud to texture the Walls: We had leftover mud from other rooms but if we had to buy some, a whole bucket only costs $13.94 at Lowe's
  • Cabinet Paint from Sherwin Williams (1 quart): $17.34
  • Wall Paint from Sherwin Williams (1 gallon): $31.06
  • Rustoleum Spray Paint for the fixtures: $6.76
  • Cabinet Hardware: The knobs were $2.97 each and the pulls were $3.47 each from Lowe's, totaling $21.79
  • Grey floral curtains from Target: $24.99
  • White curtain from Wal-Mart: $14.47
  • Curtain Rods: $12.48 x 2 totaling $24.96
  • Mirror: Free! This was given to us from relatives. We would have framed out the existing mirror if we hadn't gotten lucky with this one.
  • Chalk paint for the Mirror: $9.69
  • Rug from Target: $24.99
  • Towel Hooks: $9.23 (Half off at Hobby Lobby)
  • Accessories: $10 (We already had the frames book, basket, and mason jars. The white owl was a $2 garage sale purchase, and the hung art was $8 at Hobby Lobby)
Grand Total: $195.28

I don't want to come across as too braggy but our bathroom is amazeballs. We're always looking ahead though, and still have more projects in mind. In the shorter term, we still need to replace the sink faucet and light fixture. Longer term, we want to rip up the flooring and replace it with new tile. We'd also love to re-tile the shower/tub area but that's much lower on our priority list now that we have a jazzy new curtain to cover it up.

I hope everyone had a great 4th of July weekend! We sure did!
Katy

P.S. I'm joining link parties at Share Your Creativity, I Heart Organizing, and Thrifty Decor Chick !